Let's make a 3-D Button 

Let's make a 3-D Button
|
|
Skill level: Beginner
Software used: Paintshop Pro, Download a 30 day trial version at www.jasc.com/
In this tutorial we will go over the steps to create one of those buttons you allways see on web pages. This tutorial is intended for the computer art novice.
The software chosen for this exercise was Paintshop Pro. The reason for this is, it is easily obtainable off the internet.
Step 1.
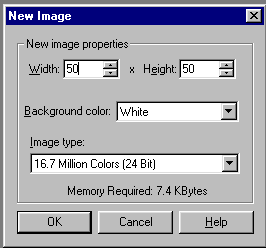
| From the Menu bar click File and new image. Make sure the setting are like the picture on the right then click Ok. You should now see a small white box appear. |
 Click on the image for a larger
view. Click on the image for a larger
view. |
Step 2.
| Now click on the selection tool. It is to the right of the hand icon. Under selection type, pick circle as shown. | 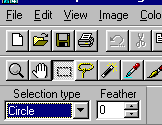 |
Step 3.
| Now with your cursor. Place it at the far upper left corner of the white square, and drag it down towards the bottom right portion of the square. You should now see a circular dash line in your white box. It should be about the size of a penny. This may take several tries to get a good circle. Be patient here. | 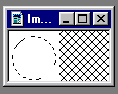 |
Step 4.
| Place your cursor over the the color selection bar.(It is the rainbow looking thing at the very right of the paintshop window.) A little eyedropper should appear. Pick a color that you like. For me I picked yellow. Once your color is selected click on the Flood fill tool. It is next to the Big 'A' icon as shown on the right. This is your paint bucket tool. It will fill any selected area with a color that you select on the color bar. | 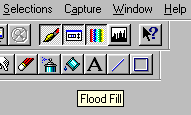 |
Step 4a.
| If all went well your cursor should look like a tilted bucket. Place the cursor in the middle of your circle and left click your mouse. You should have a image similar to the one on the right. | 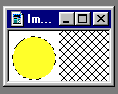 |
Step 5.
At the menu bar. Select Image » Special effects
»Buttonize. In the Buttonize window. Select the following:
Your image should appear as shown on the right. |
 At this point you should see the dashed lines around your button. We want to get rid of that. Simply move your cursor over the image, and right click with your mouse. |
Step 6.
| Ok now. We are getting close to the end. On to the final touches. Click on the big 'A' icon next to the Flood Fill icon. This is your text entry tool. Then click somewhere in the middle of your image. A menu should pop up. Make the following selections as shown on the right:
|
 Click on the image to enlarge. |
Step 6a.
At this point you should see a blinking smile face. J Carefully with your mouse, move your cursor over the smile face intil you see a big X. At this point click and drag intil your smile face is pretty well centered.
And Viola you now have a smile face.
Use this same method with other letters using the Wingding fonts. You can make some cool buttons really easy.